Using Kanban Boards in Clarive
Clarive provides you an interactive Kanban mode to view the topics in a board mode so that it is easier to handle several topics at once.
In addition, we offer you the possibility to change the status of a specific topic just dragging and dropping it to the desired status, also you can deploy a topic without leaving board.
There are three ways to view topics in a Kanban board. The first is to create a Board from zero through the Create
button located in the top menu.
Another way to view a kanban board is from a grid of topics. We will see the Kanban button
![]() that shows the topics listed in the grid. This board respects the filters
that have been added in the grid of topics.
that shows the topics listed in the grid. This board respects the filters
that have been added in the grid of topics.
Finally you can open a Kanban Board from a Release topic. These releases can contain topics, so in the Board you will see only the topics included in the Release.
Kanban types
-
Static - With static Kanbans, you'll have full control of the cards/topics you want to show on the board, it's useful if you need to complete a set of topic tasks and no other topics allowed to appear on the board at the same time, use this type if you want to work on specific topics and your workflow ends when these topics are done.
-
Dynamic - With dynamic Kanban, you can't add topics manually, however, you can set filters for that board from the configurations, any topic matches the filters will appear on the board automatically, it's more like a continuous visualization of the work-flow across a project or multiple projects.
Create a new Kanban Board
To create a new Kanban Board, click on Create button at the top of the page and select Kanban. From the new window,
write a name and select the type of the board, static or dynamic.
Once the name and type have been confirmed, an empty board will be opened.
Don't worry, it's time to start setting up the board to visualize the topics you want to work with.
To start configuring your board, click on the Configuration button at the top right side of the board. the
Configuration section is divided into three sections.
Configuration
The first section is General Settings where you can rename the board or share it with any user registered in your
Clarive solution. This user will not be able to access the board configuration but he/she can interact with the board
(view topics, change topic status and deploy to a job).
From Filters section, you can define filters of the topics you want to show on your board.
These Filters works differently for each kanban type.
In dynamic kanban, filters will be used to show matched topics on the board, in static kanban, however, filters
will be used to show topics in Plan Mode section where you can select topics to add to your board.
For example, if you have a dynamic board and you want to show all topics related to project Clarive you need to set
filters to project Clarive
On the other hand, if you have a static board, and you set filters to category Bugs and status New, nothing will
appear on your board, but if you click on the Plan Mode button at the top left corner of your static board, all topics
from Bugs category and with status New will appear so you can choose which topic to show on your board.
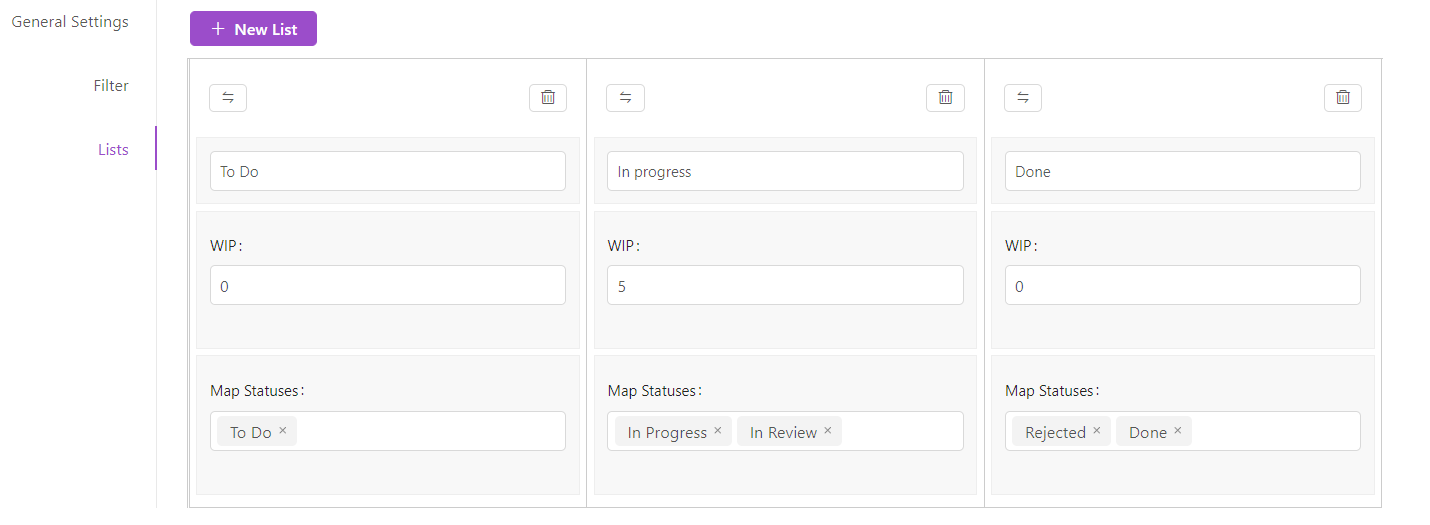
Finally, in List section you have to configure the columns that you want to show on the board, this is the most
important step to start viewing cards on the board, without settings your columns and their mapped statuses you'll not
be able to see anything. By default all new created kanban boards will start with three default columns To do, Doing
and Done, before click save, make sure to map their statuses to match your work-flow process.
Other options you can set for each list are:
- Name: List name
- WIP: Work In process Limit
- Statuses Map: Topics with matched statuses to the
Map Statusesfield will appear under this list.
You can also drag each list to change it's view order, or even delete the list completely by clicking on the delete icon at the top right corner of the list.
Info
You can select more than one status for each list, and when you move some topic to that list from another list, a pop-up window will ask you to which status you want this topic to be moved to, this only happens if your workflow allows moving that topic to more than one status in the same list, otherwise the only matched status will be applied automatically.
For our standard three-column kanban the configuration would look like this:
When you finish configuring the board, click Save button.
Note
Once saved, you can access your kanban later by going to Boards
section from Clarive main menu on the left.
Quick View
Quick View button on the main board gives you options for easy board navigation, below is
a table of the available options.
| # | Quick View Options |
|---|---|
| 1 | Auto Refresh - enable/disable board auto refreshing |
| 2 | Cards Per List - number of cards to show on each list, default to 10 cards |
| 3 | Collapse Empty Lists - collapse/expand empty lists |
| 4 | Collapse All Lists - collapse/expand all lists |
| 5 | Collapse Empty Swimlanes - collapse/expand empty swimlanes |
| 6 | Collapse All Swimlanes - collapse/expand all swimlanes |
Quick view settings will be saved in browser session, next time you visit the board
it will use last Quick View options you defined.
Auto Refresh
Instead of reloading your tab or browser for new board changes you can enable Auto Refresh
option from The Quick View button on the board
Quick Filters
Quick filters Filter button on the main board view is a way to filter existing topics on the board, it can be used by
all board members to limit the topics they can see on the board, these filters do not apply to the main filter which has
been defined by the kanban owner from the Configuration section, these filters are only for easier visualization
purposes.
Swimlanes
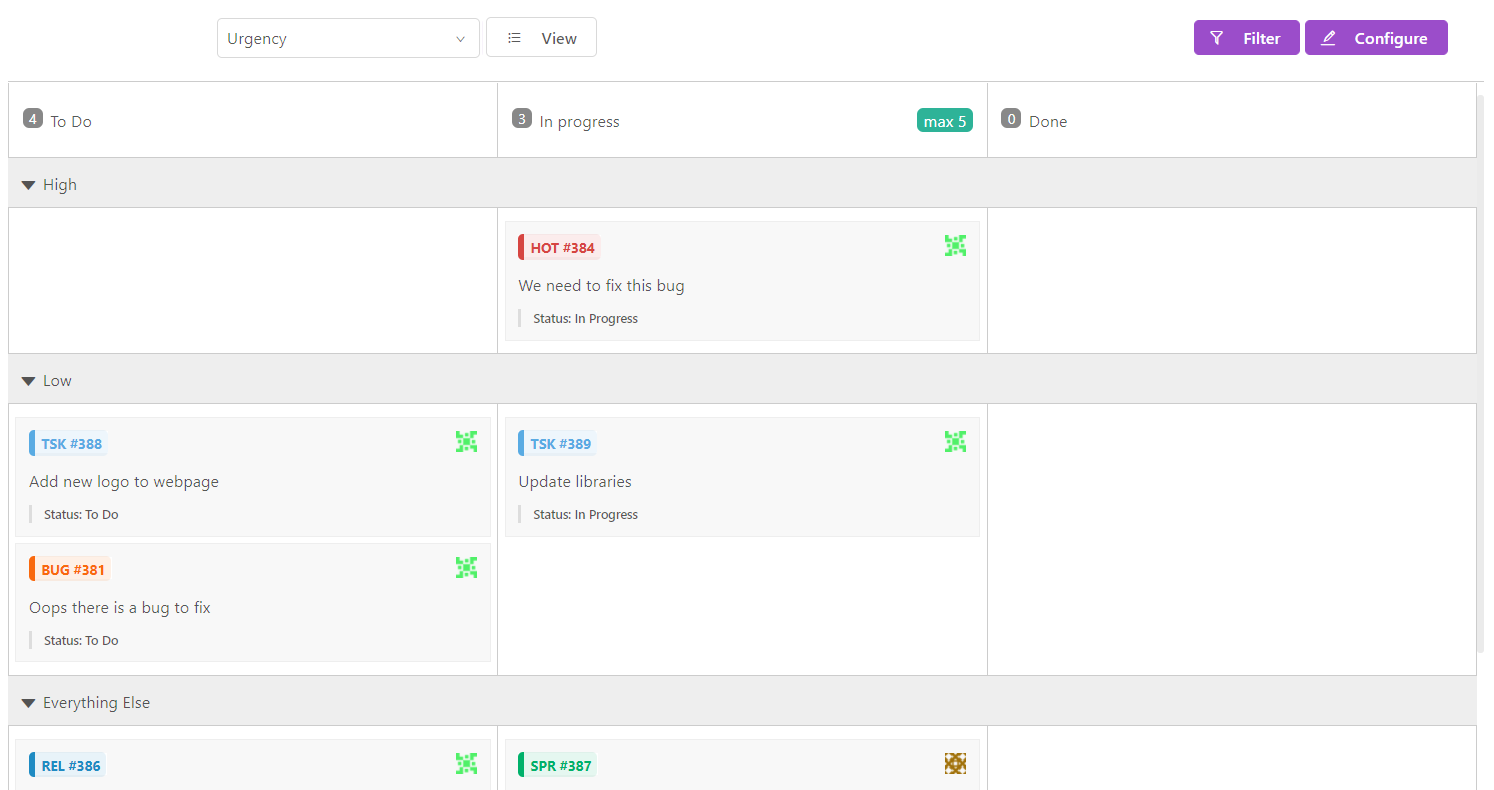
Swimlanes divide the board horizontally and classify topics according to the swimlane chosen by the user.
For example, if a user wants to classify topics according to their Urgency, the Kanban will look like this:
Swimlane settings will be kept for the user session so next time the user opens this board it will be shown with the last swimlane used.
Configure swimlanes
By default newly created kanban boards start with two swimlanes, Creator and Categories, but you're not limited
to that, you can add new swimlanes by going to Configure then click on the Swimlanes tab
You can start by selecting which field you want to use as your swimlane data source, current supported field types are:
- Users
- Related Topics
- Releases
- Pills
- Combo
- Number
After selecting the required field, click on the plus icon to add a new swimlane to your board
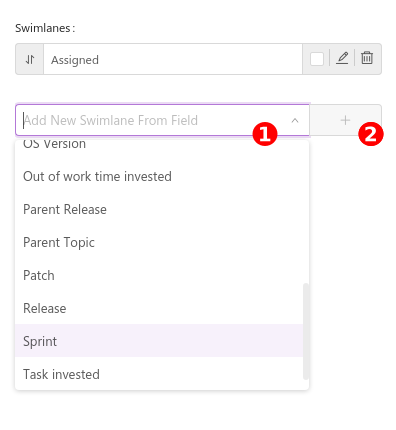
| # | Description |
|---|---|
| 1 | Select field |
| 2 | Add selected field as a new swimlane |
All custom swimlanes will be listed as shown in the following picture.
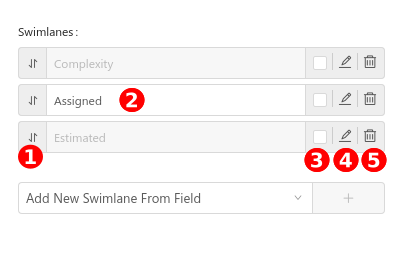
| # | Description |
|---|---|
| 1 | Change swimlanes order by dragging here |
| 2 | Edit swimlane name as you want to see in the swimlane drop down menu |
| 3 | Check to set as the default view for your kanban board |
| 4 | Click to edit swimlane |
| 5 | Click to delete swimlane |
When you click on the edit icon, a new window will open on the right with your swimlane details and options,
below you will find a descriptive image of the different options you can edit to customize the swimlane.
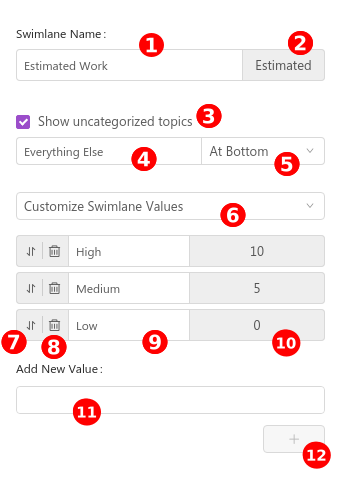
| # | Description |
|---|---|
| 1 | Swimlane name edit |
| 2 | Indicator for original field name |
| 3 | Check/uncheck if you want to view or hide uncategorized topics |
| 4 | Uncategorized topics swimlane name |
| 5 | Uncategorized topics swimlane position |
| 6 | Either view all possible values for this swimlane field or customize the values you want to see |
| 7 | Drag to change swimlanes position on the board |
| 8 | Delete custom value |
| 9 | Edit value name as you want it to appear on your board |
| 10 | Indicator for the original value / user / topic id |
| 11 | Select new field value |
| 12 | Add selected value |
Configure Card Layout
Cards on board have three sections by default
- Category and ID
- Title
- Status
There are two ways for you to add more fields to the card:
Default cards configuration in Form Rules
In form rule design you can check the configuration option View in kanban for those fields you want
to view in cards. That option is available for fields of type:
- Text
- Project
- Pills
- Combo
- Number
- Calculated number
- Progress bar
The fields that you configure in the form rule (plus id, title and status) will be shown as the default card layout for all new boards and all pre-existing ones that use the default configuration.
Configure - Card Layout
In this configuration panel you can:
- Select the way users will be shown in cards:
Avatar only,Avatar + usernameorAvatar + real name - Select if you want to view
StatusesandLabelsin cards.
Tip
View status is recommended if you have multi-status lists in your panel
-
select the default layout (fields) configuration or customize it for this board.
-
To use the default configuration, select the
Defaultbutton inCard Fields.
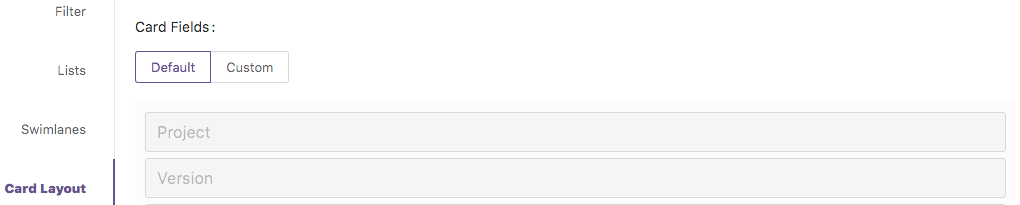
- To customize the fields layout for this board, select the
Custombutton inCard Fields.
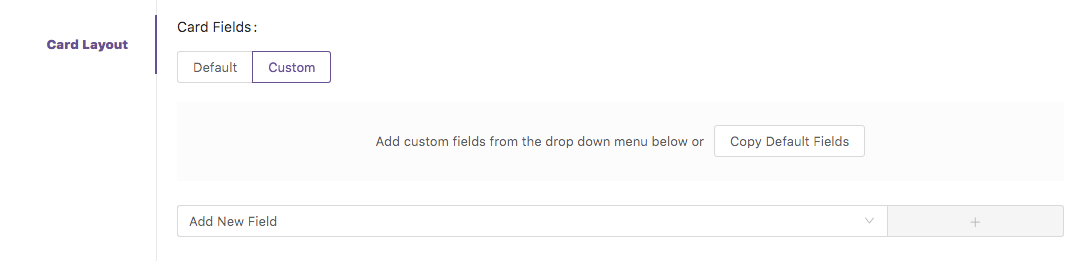
To copy the default layout fields click on Copy Default Fields and all the default fields will be added
to the list automatically.
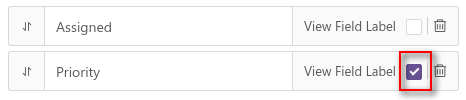
To add a new field, select the required field from the drop down menu and click on + button
Fields will show in a list where you can change their apperance order on the card by dragging them
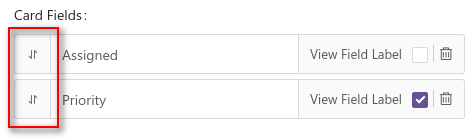
By default, field label will appear on the card just above field value, you can hide
field lables by unchecking View Field Label option
Visualization tools
By default dynamic boards have a limit of 10 cards per list to be shown at once, this can be increased or decreased by
clicking on the View button from the main kanban board and change the value of the Cards Per List field, this limit
does not apply to the static boards, so this option is totally omitted in static boards.
View button also allows you to easily collapse all lists and swimlanes with one click.
Working with Topics
Members of the kanban board can view topics cards, change their statuses, deploy jobs as long as their administration and work-flow permissions allows it, to move from list to another, hence change topic status, a user just need to drag that topic card then, all lists he/she can move to will be indicated by a blue color, hover on that blue list and drop.
You can also view topic data by clicking on it's card.
Deploying jobs from Kanban board
With Clarive, it is possible to deploy topics from a Kanban board.
To deploy, you don't have to do anything except dragging the topic as of how you want to move it to another list, if that topic has deployment process available a new job window will open on the right and you can drop it to one of the available deployments.
Once the topic is dropped in the desired deployment type, in the same window, you can configure all the available options to perform a deployment: Transition to use, Rule and version, and Calendar slots.
Info
Adjust the hour with the purple bar and the minutes with the green bar
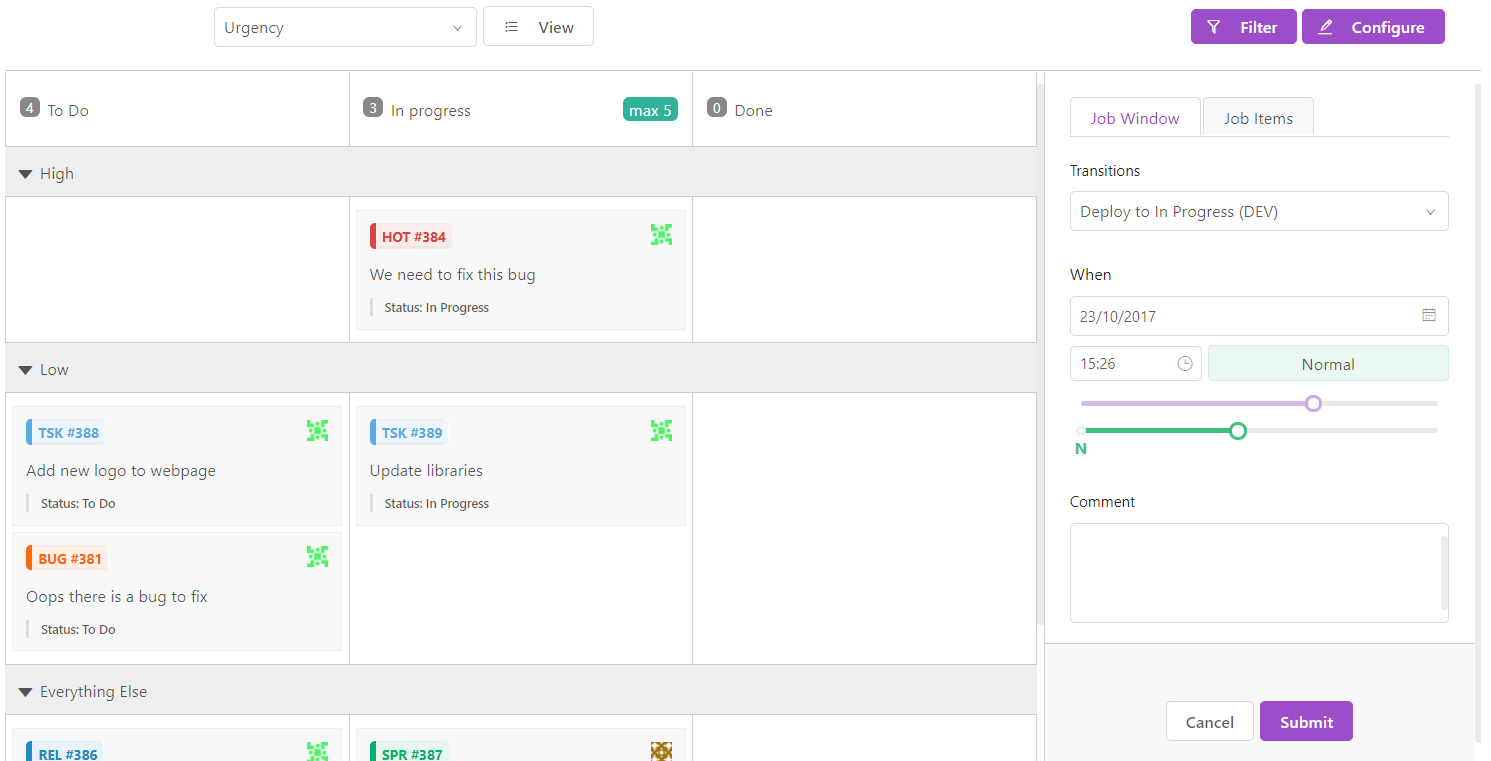
In the Job item tab you can see the topics to be deployed
Just click on Submit to deploy your job now or at the scheduled time.
Tip
Go to ![]() Monitor to track the progress
of your deployment.
Monitor to track the progress
of your deployment.
Opening a Kanban board from a topic grid
It is possible to open a Kanban Board with the current topics without having to create a dashboard from zero.
For example, from any topic grid we have the Kanban button ![]() to show the
topics listed on a board.
to show the
topics listed on a board.
From this board it is also possible to perform the operations described above such as moving or deploying a topic.
Opening a Kanban from a Release topic
A Release topic allows you to group multiple topics. You can view release topics in a kanban board immediately by
clicking on the Kanban board button
![]() inside a Release topics. This Kanban Board only shows the topics included
in
the Release.
inside a Release topics. This Kanban Board only shows the topics included
in
the Release.
Note
Please note that kanban boards opened from a release topic or from topics grid are a temporary boards, meaning they
will not be saved permanently in the data base, to save them you have to click on the Configure button and then click
Save.